2009/10/22 11:24:03
BargainSaleViewController.m
----------------------------------------------------------------------------------------------------------
ヘッダーファイルの読み込み
#import "BargainSaleViewController.h"
クラスの実装部(インプリメント部)と呼ぶそうだ。(詳解 Objective-C 2.0 より)
より)
@implementation は実装部の始まりの宣言!
@implementation BargainSaleViewController
- (IBAction)buttonValueChanged:(id)sender {
//割引率を保持する変数
float discount_value = 0.2f; 小数(float)の場合、f をつけるらしい▼
//セグメンテッドコントロールの選択位置から割引率を決定
int selected_index = [discountButton selectedSegmentIndex];
↑整数型( int )の selected_index に selectedSegmentIndex から読み込んだ値( discountButton )を入れる

どのボタンが押されたのか?
switch(selected_index){
case 0:
discount_value = 0.2f;
break;
case 1:
discount_value = 0.3f;
break;
case 2:
discount_value = 0.4f;
break;
case 3:
discount_value = 0.5f;
break;
default:
break;
}
//選択されている割引率の位置にスライダーのつまみを動かす
[discountSlider setValue:discount_value animated:YES];
‾‾‾‾‾‾‾‾‾‾‾‾‾‾‾‾‾‾‾‾‾‾‾‾‾‾‾‾‾‾‾‾‾‾‾‾‾‾‾‾‾‾‾‾‾‾‾‾‾‾‾‾‾‾
setValue について調べてみた。
setValue:animated:
Sets the receiver’s current value, allowing you to animate the change visually.
- (void)setValue:(float)value animated:(BOOL)animated
//割引率をパーセント形式でラベルに表示
[discountPercent setText:[NSString stringWithFormat:@"%d", (int)(discount_value * 100.f)]];
//元値と割引率から割引後の値段を計算してラベルに表示
int price_original = [[priceOriginal text] intValue];
if(price_original > 0){
[priceNew setText:[NSString stringWithFormat:@"%d", (int)(price_original * (1.f - discount_value))]];
割引後の値段を計算 したら 10進数 で整形( stringWithFormat ) して 文字列に変換( NSString ) 、Text 形式のpriceNew にセットする。
}
}
キーボードを閉じるきっかけとなるパーツから呼び出されるアクションです。ここではセグメンテッドコントロール( (IBAction)escapeButtonPush )の値が変更された時とスライダー( (IBAction)escapeButtonPush )が変更された時にアクションが実行されるよう設定▼
- (IBAction)escapeButtonPush:(id)sender {
[priceOriginal endEditing:YES];
}
priceOriginal を入力する時に表示されたキーボード を消す
カートに追加するためのボタンが押された時のアクションは単純で,priceNewに表示されている値とcartPriceに表示されている値を足し合わせたものを,cartPriceに書き戻せば良い▼
- (IBAction)pushAddCart:(id)sender {
int a = [[cartPrice text] intValue] + [[priceNew text] intValue];
[cartPrice setText:[NSString stringWithFormat:@"%d",a]];
}
注:▶目指せ!iPhoneアプリ開発エキスパート(アクションの実装) の通り入力したらエラーになっちゃいました。
記事の説明では、
int a = [[cartPrice text] intValue] + [[priceNew text] intValue]; を1行追加しました。
カートをクリアするボタンが押されたときのアクションです。ダイアログを表示して,ユーザにカートをクリアして良いかを確認します。「クリアする」が押さ れたら,実際にカートの中身の金額を0にします。ダイアログでの選択結果を受け取るためのプログラムを追加で記述します。

←こんなアラートを表示します。
- (IBAction)pushClearCart:(id)sender {
UIActionSheet *actionSheet = [[UIActionSheet alloc] initWithTitle:@"カートをクリアしますか?" delegate:self cancelButtonTitle:@"キャンセル" destructiveButtonTitle:@"クリアする" otherButtonTitles:nil];
[actionSheet showInView:self.view];
[actionSheet release];
}
↑日本語の部分とメソッド名だけ変えれば使い回しができるのかなぁ・・・
- (IBAction)sliderValueChanged:(id)sender {
//スライダーの値から割引率を決定,0.5単位に切り捨てる
float discount_value = (int)([(UISlider*)sender value] * 20) / 20.f;
//セグメンテッドコントロールに一致する割引率があれば選択されている状態にする
if(discount_value == 0.2f){
[discountButton setSelectedSegmentIndex:0];
}
else if(discount_value == 0.3f){
[discountButton setSelectedSegmentIndex:1];
}
else if(discount_value == 0.4f){
[discountButton setSelectedSegmentIndex:2];
}
else if(discount_value == 0.5f){
[discountButton setSelectedSegmentIndex:3];
}
else{
[discountButton setSelectedSegmentIndex:-1];
}
//割引率をパーセント形式でラベルに表示
[discountPercent setText:[NSString stringWithFormat:@"%d", (int)(discount_value * 100.f)]];
//元値と割引率から割引後の値段を計算してラベルに表示
int price_original = [[priceOriginal text] intValue];
if(price_original > 0){
[priceNew setText:[NSString stringWithFormat:@"%d", (int)(price_original * (1.f - discount_value))]];
}
}
- (void)actionSheet:(UIActionSheet *)actionSheet clickedButtonAtIndex:(NSInteger)buttonIndex {
if(buttonIndex == 0){
//カートをクリアする
[cartPrice setText:[NSString stringWithFormat:@"%d", 0]];
}
}
@end
----------------------------------------------------------------------------------------------------------
ヘッダーファイルの読み込み
#import "BargainSaleViewController.h"
クラスの実装部(インプリメント部)と呼ぶそうだ。(詳解 Objective-C 2.0
@implementation は実装部の始まりの宣言!
@implementation BargainSaleViewController
- (IBAction)buttonValueChanged:(id)sender {
//割引率を保持する変数
float discount_value = 0.2f; 小数(float)の場合、f をつけるらしい▼
//セグメンテッドコントロールの選択位置から割引率を決定
int selected_index = [discountButton selectedSegmentIndex];
↑整数型( int )の selected_index に selectedSegmentIndex から読み込んだ値( discountButton )を入れる
どのボタンが押されたのか?
switch(selected_index){
case 0:
discount_value = 0.2f;
break;
case 1:
discount_value = 0.3f;
break;
case 2:
discount_value = 0.4f;
break;
case 3:
discount_value = 0.5f;
break;
default:
break;
}
//選択されている割引率の位置にスライダーのつまみを動かす
[discountSlider setValue:discount_value animated:YES];
‾‾‾‾‾‾‾‾‾‾‾‾‾‾‾‾‾‾‾‾‾‾‾‾‾‾‾‾‾‾‾‾‾‾‾‾‾‾‾‾‾‾‾‾‾‾‾‾‾‾‾‾‾‾
setValue について調べてみた。
setValue:animated:
Sets the receiver’s current value, allowing you to animate the change visually.
- (void)setValue:(float)value animated:(BOOL)animated
//割引率をパーセント形式でラベルに表示
[discountPercent setText:[NSString stringWithFormat:@"%d", (int)(discount_value * 100.f)]];
//元値と割引率から割引後の値段を計算してラベルに表示
int price_original = [[priceOriginal text] intValue];
if(price_original > 0){
[priceNew setText:[NSString stringWithFormat:@"%d", (int)(price_original * (1.f - discount_value))]];
割引後の値段を計算 したら 10進数 で整形( stringWithFormat ) して 文字列に変換( NSString ) 、Text 形式のpriceNew にセットする。
}
}
キーボードを閉じるきっかけとなるパーツから呼び出されるアクションです。ここではセグメンテッドコントロール( (IBAction)escapeButtonPush )の値が変更された時とスライダー( (IBAction)escapeButtonPush )が変更された時にアクションが実行されるよう設定▼
- (IBAction)escapeButtonPush:(id)sender {
[priceOriginal endEditing:YES];
}
priceOriginal を入力する時に表示されたキーボード を消す
カートに追加するためのボタンが押された時のアクションは単純で,priceNewに表示されている値とcartPriceに表示されている値を足し合わせたものを,cartPriceに書き戻せば良い▼
- (IBAction)pushAddCart:(id)sender {
int a = [[cartPrice text] intValue] + [[priceNew text] intValue];
[cartPrice setText:[NSString stringWithFormat:@"%d",a]];
}
注:▶目指せ!iPhoneアプリ開発エキスパート(アクションの実装) の通り入力したらエラーになっちゃいました。
記事の説明では、
- (IBAction)pushAddCart:(id)sender {
    [cartPrice setText:[NSString stringWithFormat:@"%d", ];
}int a = [[cartPrice text] intValue] + [[priceNew text] intValue]; を1行追加しました。
カートをクリアするボタンが押されたときのアクションです。ダイアログを表示して,ユーザにカートをクリアして良いかを確認します。「クリアする」が押さ れたら,実際にカートの中身の金額を0にします。ダイアログでの選択結果を受け取るためのプログラムを追加で記述します。
←こんなアラートを表示します。
- (IBAction)pushClearCart:(id)sender {
UIActionSheet *actionSheet = [[UIActionSheet alloc] initWithTitle:@"カートをクリアしますか?" delegate:self cancelButtonTitle:@"キャンセル" destructiveButtonTitle:@"クリアする" otherButtonTitles:nil];
[actionSheet showInView:self.view];
[actionSheet release];
}
↑日本語の部分とメソッド名だけ変えれば使い回しができるのかなぁ・・・
- (IBAction)sliderValueChanged:(id)sender {
//スライダーの値から割引率を決定,0.5単位に切り捨てる
float discount_value = (int)([(UISlider*)sender value] * 20) / 20.f;
//セグメンテッドコントロールに一致する割引率があれば選択されている状態にする
if(discount_value == 0.2f){
[discountButton setSelectedSegmentIndex:0];
}
else if(discount_value == 0.3f){
[discountButton setSelectedSegmentIndex:1];
}
else if(discount_value == 0.4f){
[discountButton setSelectedSegmentIndex:2];
}
else if(discount_value == 0.5f){
[discountButton setSelectedSegmentIndex:3];
}
else{
[discountButton setSelectedSegmentIndex:-1];
}
//割引率をパーセント形式でラベルに表示
[discountPercent setText:[NSString stringWithFormat:@"%d", (int)(discount_value * 100.f)]];
//元値と割引率から割引後の値段を計算してラベルに表示
int price_original = [[priceOriginal text] intValue];
if(price_original > 0){
[priceNew setText:[NSString stringWithFormat:@"%d", (int)(price_original * (1.f - discount_value))]];
}
}
- (void)actionSheet:(UIActionSheet *)actionSheet clickedButtonAtIndex:(NSInteger)buttonIndex {
if(buttonIndex == 0){
//カートをクリアする
[cartPrice setText:[NSString stringWithFormat:@"%d", 0]];
}
}
@end
PR
2009/10/21 17:32:05
iPhone Dev Center の Getting Started Documents の文章を赤(★マーク)でコピペしときます。
★Objective-Cでのクラスの指定には、2つの別々の要素が必要です。すなわち、インターフェイスと実装です。インターフェイ ス部分ではクラス宣言を記述し、そのクラスに関連付けられているメンバ変数(インスタンス変数)とメソッドを定義します。
実装部分( BargainSaleViewController.m にってことか)には、クラス のメソッドの実際のコードを記述します。(Getting Started Documents 13pより)
これから解析する BargainSaleViewController.h(ヘッダーファイル) はインターフェイスの部分の設定とクラスの宣言(定義)をするファイル。
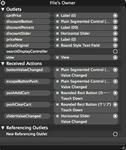
 アウトレット
priceOriginal -(1)テキストフィールド
discountButton -(2)セグメンテッドコントロール
discountPercent -(3)ラベル
discountSlider -(4)スライダー
priceNew -(5)ラベル
cartPrice -(7)ラベル
アクション
buttonValueChanged: - (2)セグメンテッドコントロール / Value Changed
sliderValueChanged: - (4)スライダー / Value Changed
escapeButtonPush: - (2)セグメンテッドコントロール / Value Changed ,
(4)スライダー / Value Changed
pushAddCart : - (6)ボタン / Touch Down
pushClearCart: - (8)ボタン / Touch Down
BargainSaleViewController.h
-----------------------------------------------------------------------------------
// 利用するクラスのヘッダファイルの読み込み
// #import< ヘッダファイル名 > と記述する
#import <UIKit/UIKit.h>
#import <Foundation/Foundation.h>
//@interface クラスの宣言
//BargainSaleViewController クラス名
//UIViewController 親クラスの名前
@interface BargainSaleViewController : UIViewController {
Interface Builder でレイアウトしたパーツと各変数(インスタンス変数)との関連付け
IBOutlet : Interface Builder に対する目印!Interface Builder で作ると付加されるマークみたいなもんか??
型 インスタンス変数名
IBOutlet id cartPrice;
IBOutlet id discountButton;
IBOutlet id discountPercent;
IBOutlet id discountSlider;
IBOutlet id priceNew;
IBOutlet id priceOriginal;
}
メソッドの宣言
Interface Builder でレイアウトしたパーツと動的処理( Action )との関連付け
-:インスタンスメソッド
( 戻り値 )
メソッド名:
パラメータ
- (IBAction)buttonValueChanged:(id)sender;
- (IBAction)escapeButtonPush:(id)sender;
- (IBAction)pushAddCart:(id)sender;
- (IBAction)pushClearCart:(id)sender;
- (IBAction)sliderValueChanged:(id)sender;
@end
-----------------------------------------------------------------------------------
.h ファイルはインターフェイス(入出力)の宣言を行うファイル構成なのかな・・・
細かく書いてくと、なんとなくパターンていうかルールがわかってきたな!
Xcode,Interface Builder で作る場合は、自動的に出来上がってるんだろうな・・・
問題は、.m( ソースコードファイル ) 、実装部分の処理をきちんとプログラムすることなんだな!
↓この本も参考にしながら勉強してます。


★Objective-Cでのクラスの指定には、2つの別々の要素が必要です。すなわち、インターフェイスと実装です。インターフェイ ス部分ではクラス宣言を記述し、そのクラスに関連付けられているメンバ変数(インスタンス変数)とメソッドを定義します。
実装部分( BargainSaleViewController.m にってことか)には、クラス のメソッドの実際のコードを記述します。(Getting Started Documents 13pより)
これから解析する BargainSaleViewController.h(ヘッダーファイル) はインターフェイスの部分の設定とクラスの宣言(定義)をするファイル。
priceOriginal -(1)テキストフィールド
discountButton -(2)セグメンテッドコントロール
discountPercent -(3)ラベル
discountSlider -(4)スライダー
priceNew -(5)ラベル
cartPrice -(7)ラベル
アクション
buttonValueChanged: - (2)セグメンテッドコントロール / Value Changed
sliderValueChanged: - (4)スライダー / Value Changed
escapeButtonPush: - (2)セグメンテッドコントロール / Value Changed ,
(4)スライダー / Value Changed
pushAddCart : - (6)ボタン / Touch Down
pushClearCart: - (8)ボタン / Touch Down
BargainSaleViewController.h
-----------------------------------------------------------------------------------
// 利用するクラスのヘッダファイルの読み込み
// #import< ヘッダファイル名 > と記述する
#import <UIKit/UIKit.h>
#import <Foundation/Foundation.h>
//@interface クラスの宣言
//BargainSaleViewController クラス名
//UIViewController 親クラスの名前
@interface BargainSaleViewController : UIViewController {
Interface Builder でレイアウトしたパーツと各変数(インスタンス変数)との関連付け
IBOutlet : Interface Builder に対する目印!Interface Builder で作ると付加されるマークみたいなもんか??
型 インスタンス変数名
IBOutlet id cartPrice;
IBOutlet id discountButton;
IBOutlet id discountPercent;
IBOutlet id discountSlider;
IBOutlet id priceNew;
IBOutlet id priceOriginal;
}
メソッドの宣言
Interface Builder でレイアウトしたパーツと動的処理( Action )との関連付け
-:インスタンスメソッド
( 戻り値 )
メソッド名:
パラメータ
- (IBAction)buttonValueChanged:(id)sender;
- (IBAction)escapeButtonPush:(id)sender;
- (IBAction)pushAddCart:(id)sender;
- (IBAction)pushClearCart:(id)sender;
- (IBAction)sliderValueChanged:(id)sender;
@end
-----------------------------------------------------------------------------------
.h ファイルはインターフェイス(入出力)の宣言を行うファイル構成なのかな・・・
細かく書いてくと、なんとなくパターンていうかルールがわかってきたな!
Xcode,Interface Builder で作る場合は、自動的に出来上がってるんだろうな・・・
問題は、.m( ソースコードファイル ) 、実装部分の処理をきちんとプログラムすることなんだな!
↓この本も参考にしながら勉強してます。
2009/10/21 17:03:38
作りたいソフトはあって気ばかりはやるけど原点に戻り基本的なことをマスターしようと思います。
てことで、以前作成した 「バーゲン教師」のサイト内で説明あるので解析&復習も兼ねて Objective-C の文法も理解してみようと思います。
Objective-C については、iPhone Dev Center の Getting Started Documents と照らし合わせます。
▶目指せ!iPhoneアプリ開発エキスパート(技術評論社)
 こんな感じで完成しました。
色だけ変えてます。
 ▶Getting Started Documents
iPhoneアプリケーション開発の概要に関する、以下の項目をまとめた PDF ファイルがダウンロードできます。iPhone OSの概要 iPhone OS 開発ツール Objective-Cの学習:入門 iPhone開発におけるSigning Code iPhoneアプリケーションの作成 Cocoaデベロッパ向けiPhone OS について書かれています。
てことで、以前作成した 「バーゲン教師」のサイト内で説明あるので解析&復習も兼ねて Objective-C の文法も理解してみようと思います。
Objective-C については、iPhone Dev Center の Getting Started Documents と照らし合わせます。
▶目指せ!iPhoneアプリ開発エキスパート(技術評論社)
色だけ変えてます。
iPhoneアプリケーション開発の概要に関する、以下の項目をまとめた PDF ファイルがダウンロードできます。iPhone OSの概要 iPhone OS 開発ツール Objective-Cの学習:入門 iPhone開発におけるSigning Code iPhoneアプリケーションの作成 Cocoaデベロッパ向けiPhone OS について書かれています。
|ホーム|